Mini-Activity One, Art + Science: "Optical Cube"
Title: Optical Cube
Length: Three-45 minute periods
Grade Level: 10th & 11th
Theme Concept(s):
Illusion- created by manipulating lines and forms. Movement (vibration)- created by the placement of lines and (complimentary) colors. Perspective. Value.
Art History, Aesthetics, Art Criticism: Victor Vasarely’s and Bridget Riley’s works include repetition of geometric shapes and line but also incorporate perspective. Is abstract art good art? Can it convey emotions? What lines do you see? Does it remind you of anything?
Art Production Concept(s): Complimentary colors and value, effects of a light source, illusion can be created with the use of lines and forms, disturbances in these precise patterns help create the illusion.
Teaching Strategies: Introduction, Discussion, Demonstration, Art Production.
Creative & Critical Behaviors Students Will Enhance: Develop greater understanding of perspective and light sources. Increase measuring skills (with ruler) and knowledge of geometric shapes. Students will be able to identify complimentary colors and the roles they play with movement in art.
NJCCCS (one visual arts & one non-arts): Visual Arts 1.3.12.D.2- Produce an original artwork in one or more art mediums that demonstrates mastery of visual literacy, method & techniques.
Math 4.2.12 A.3- Apply the properties of geometric shapes (i.e. Parallel lines).
Materials and Supplies: Sketchbook paper 8.5”x5.5”, rulers, pencils and erasers, colored pencils.
Instructions

INTRODUCTION:
Art History- Victor Vasarely and Bridget Riley were well known Optical (Op) Artists. The movement began officially around the 1960s, derived from the Bauhaus movement. Vasarely was producing works that resembled op Art as early as the 1930s. Riley began her works around the 1960s. The use of repetition of line, form and pattern was one way Op Artists created the illusion of movement. Some works also incorporated perspective and value.
DISCUSSION:
Aesthetics- Is abstract art good art? Can it convey emotions?
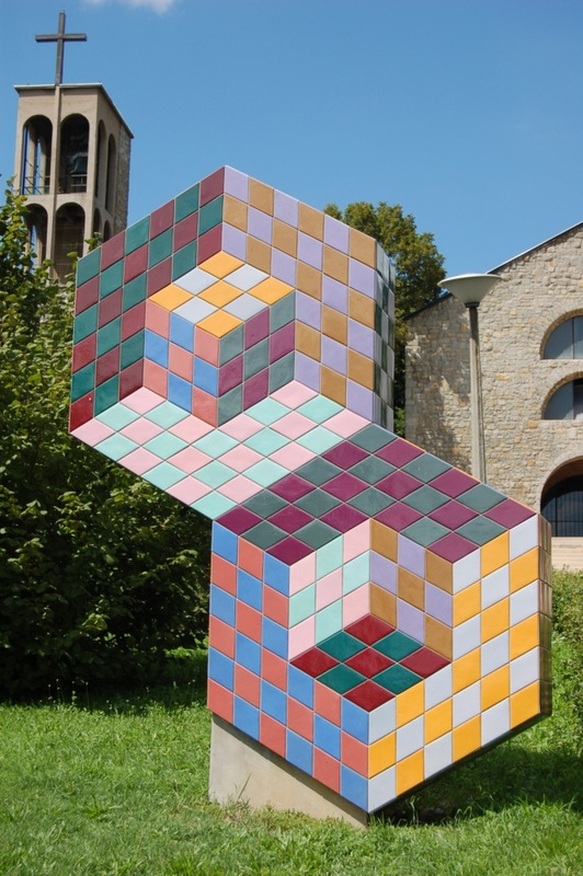
Art Criticism- What kinds of lines do you see? What role does color play? Where is the light source? Does this work (Victor Vasarely’s, Untitled, 1977, sculpture in Pecs, Hungary) remind you of anything? On your worksheet, mark the areas of one of the cubes that have the same values with matching numbers (1-3, 1= Lightest, 3= Darkest).
DEMONSTRATION:
Vocabulary: Complimentary colors [i.e. red/green, orange/blue, yellow/violet, red-orange/green-blue, yellow-orange/ blue-violet, yellow-green/red-violet], Perspective [= vanishing point(s), horizon line, vertical axis,
parallel line(s)]
Art History- Victor Vasarely and Bridget Riley were well known Optical (Op) Artists. The movement began officially around the 1960s, derived from the Bauhaus movement. Vasarely was producing works that resembled op Art as early as the 1930s. Riley began her works around the 1960s. The use of repetition of line, form and pattern was one way Op Artists created the illusion of movement. Some works also incorporated perspective and value.
DISCUSSION:
Aesthetics- Is abstract art good art? Can it convey emotions?
Art Criticism- What kinds of lines do you see? What role does color play? Where is the light source? Does this work (Victor Vasarely’s, Untitled, 1977, sculpture in Pecs, Hungary) remind you of anything? On your worksheet, mark the areas of one of the cubes that have the same values with matching numbers (1-3, 1= Lightest, 3= Darkest).
DEMONSTRATION:
Vocabulary: Complimentary colors [i.e. red/green, orange/blue, yellow/violet, red-orange/green-blue, yellow-orange/ blue-violet, yellow-green/red-violet], Perspective [= vanishing point(s), horizon line, vertical axis,
parallel line(s)]
Art Making Steps:
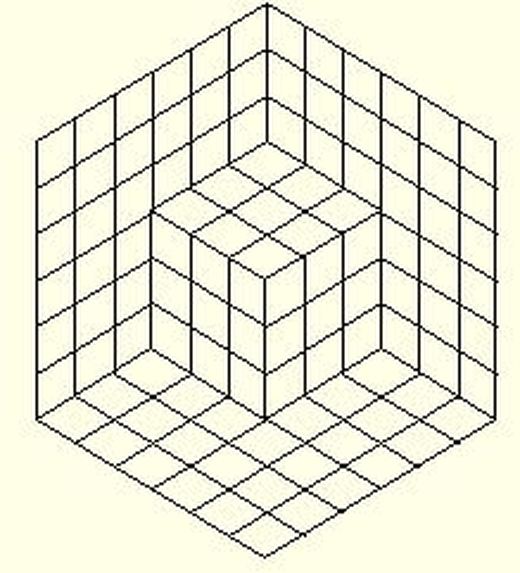
Draw a horizon line in the center of your paper (5.5” x 8.5”).
Measure with your ruler the middle of the horizon line (4.25”) and place a mark there; this will be our vertical axis. Make the vertical axis by lining your ruler up with the mark you made and drawing a vertical line.
Next, to make our vanishing points, measure in from the edges of the page ¾” (on the horizon line) from the left and right and place marks on your horizon line, these are our vanishing points. Two vanishing points mean we’re working in two-point perspective.
On our vertical axis, at the center- where the horizon line and vertical axis meet, measure 2” up and place a mark and 2” down and place a mark. We now have four marks.
Next, connect the top mark on the vertical axis to the left mark on the horizon line. Do the same for the mark on the right side of the horizon line also. This will create a triangle. Also connect the bottom mark on the vertical axis to the left and right marks on the horizon line. The final image will now be a diamond. We need a hexagon.
To make the hexagon, measure from the center point 1 ¾“ to the left and right, again placing marks in each spot. Just like we did with the vertical axis, and keeping parallel to our vertical axis, make each mark into a vertical line.
Now we’ll be making the inner cube. Measure in ¾” from all six corners of the large hexagon and place marks for each measurement. Connect all six marks to create a small hexagon with all its lines parallel to the larger hexagon.
Darken the edges of the both the large and small hexagon (total of 12 sides to be darkened). Also, for the large hexagon, you will need to darken the upper portion of the vertical axis that bridges the large and small hexagon together. You will also need to add two additional lines that connect the small hexagons two bottom corners to the larger hexagons two bottom corners (similar to a Mercedes Benz symbol or upside-down ‘Y’). Inside of the small hexagon you will need to add three lines, forming a ‘Y’. Erase all other light lines. We now have cubes.
Next, inside of the small cube, add four lines that will essentially create a grid (two lines for each side) dividing the top of the small cube into nine smaller squares. Make sure the grid lines are evenly spaced (use the centimeter side of the ruler, space them 1cm apart) and remain parallel with the lines that make up the cube.
Extend the lines (from the two bottom sides of the top of the cube) down onto the left and right sides of the cube, creating grid patterns on these sides also. Make sure these lines are also parallel with the sides that make up the cube. Also add ‘horizontal’ lines, that remain parallel, to complete the grid on the side of the cube.
Now, on the large cube, extend the small cubes lines up. Also on the sides extend the small cubes lines out, towards us. Complete the grid like pattern for the large cube making sure all of your lines remain as parallel as possible for the best effects.
Use complimentary colors to achieve movement in your piece. Make sure you refer to your worksheet we did earlier to add value appropriately. Think about where your light source is!
Worksheets below:
Victor Vasarely’s, Untitled, 1977, sculpture in Pecs, Hungary
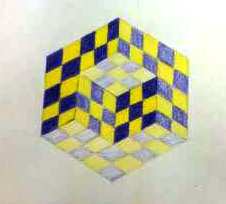
VICTOR VASCARELY'S VALUE CUBE
Name:_______________________________________ Date:________________
Use Victor Vasarely’s, Untitled, 1977, sculpture in Pecs, Hungary and mimic the value on one of the cubes in the sculpture below. Use 1 to indicate the planes that are the lightest, 2 for mid-toned planes and 3 for the darkest planes.
Sample